
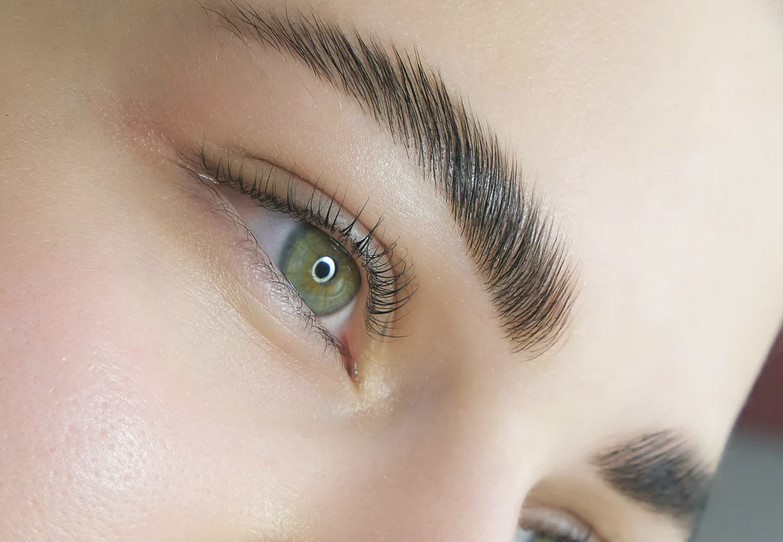
Full, shapely eyebrows make a big difference to the look of your face. If you want to simplify your daily makeup routine but still look perfect, an eyebrow lift is the way to go. With an eyebrow lift, you can have perfectly shaped eyebrows for several weeks without having to touch them up every morning.
Here you can find out everything about eyebrow lifts, how you can do it yourself and what products you will need.
What is an Eyebrow Lift?
An eyebrow lift is a cosmetic treatment similar to a perm or eyelash lift to bring the eyebrows into a desired shape for about 4-8 weeks. Some also say eyebrow lamination. It is an application where a developer gel is used to break up the hair structure to shape the hair in the appropriate direction. The fixing gel ensures that your eyebrows stay in shape.
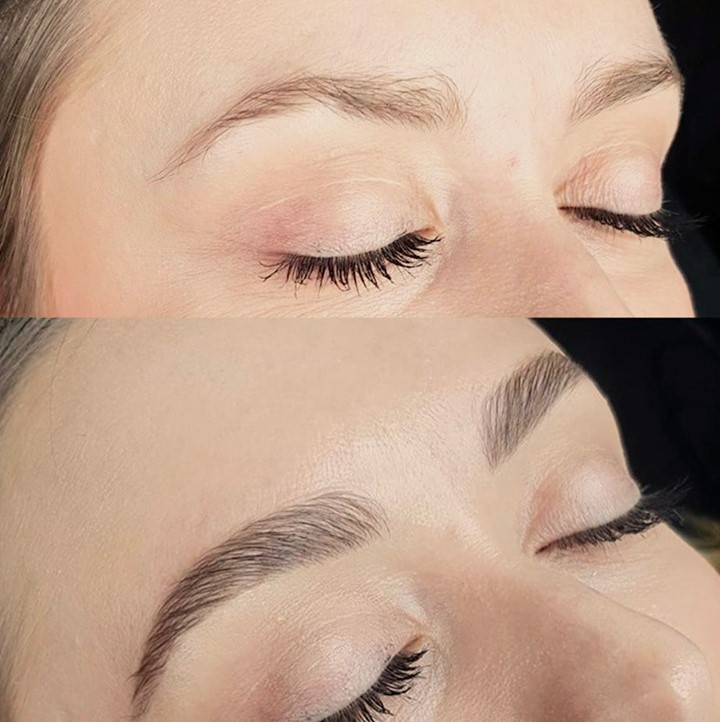
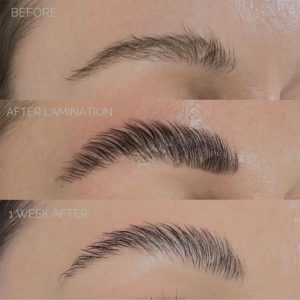
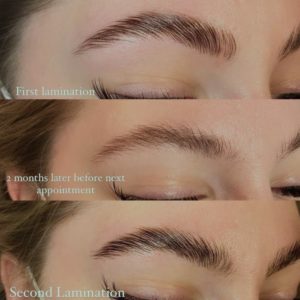
Eyebrow Lifting before and after
For whom is Brow Lifting suitable?
A brow lift is suitable for all hair and skin types. With a brow lift, thin eyebrows can be made more voluminous, unwanted gaps can be filled in and stubborn eyebrows can be shaped. It is especially suitable for thin eyebrows, because by shaping the hairs, you can conjure up full eyebrows in just a few minutes. Brow Lifting keeps even the most stubborn eyebrows under control and gives volume and effect to narrow or over-plucked brows.
How long does a Brow Lifting last?
As a rule, the effect lasts 6-8 weeks. This corresponds to the growth cycle of brow hairs. If you like the lifted look, you can then repeat and refresh the eyebrow lift. Like an eyelash lift, the eyebrow lift lasts until the individual hairs have gradually renewed themselves.
How much does Eyebrow Lifting cost?
The prices for Brow Lifting can vary greatly. In most cases, the treatment is offered for between 30 and 90 euros. It depends on whether only the pure lamination is carried out or whether the brows are really brought into perfect shape.
How long does a Brow Lift Treatment last?
In total, a brow lift treatment lasts 30-60 minutes.
Instructions for doing a Brow Lift yourself – Tutorial in 7 Steps
Get a good brow lift kit that includes all the accessories and lotions needed. In addition to the brow lifting kit, you will need cotton pads, cotton swabs, cling film and cosmetic wipes.
Step 1: Cleanse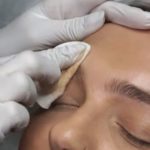
First, remove all sebum, make-up and skin care residues so that no oily residues on the brows impair the lifting effect. Use the enclosed cleanser, an oil-free eyelash shampoo or soap and water.
Step 2: Shape and glue
Now brush the eyebrows upwards with the eyebrow or mascara brush and apply the water-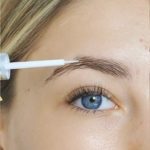 soluble skin glue. The direction in which the eyebrows should stay is determined at the same time.
It is best to do the gluing and brushing in centimetre increments so that the lifting glue at one end of the brow is not already dry while you are still brushing the other end.
If your brows already have a nice shape, you can do the perming without gluing and straightening the hairs directly while lifting.
Step 3: Lifting
Once the glue is dry, apply Perming Lotion 1 to the brows. Simply dab on carefully with a sponge stick applicator, taking care not to destroy the erect shape of the hairs. Make sure that every single hair is covered. Depending on the thickness of the hair, the lotion should be left on for 2-5 minutes when using the XXL Lashes Super Lash and Brow Lift Kit.
Some other lotions from other kits require longer exposure times of up to 10-13 min. During exposure, the brows can be covered with cling film. The heat generated by this accelerates the effect.
Attention: It is important to observe the specified exposure times. If the Perming Lotion is applied longer than recommended, the hairs will curl as if they were burnt.
Step 4: Remove
After 2-5 minutes, the lotion may be removed. Use the Y-applicator, a dry cotton pad or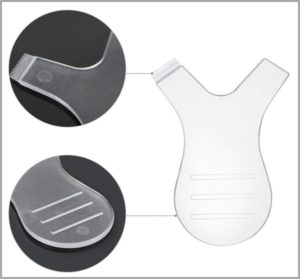 cosmetic tissue. Be careful not to destroy or change the shape of the hairs.
The Y-applicator is a very suitable instrument for removing lotions, but also for aligning the hairs in parallel with the help of the comb side. You will find it in the Super Lash and Brow Lift Kit.
Step 5: Fixing
Repeat step 3 with the second lotion, Fixing Gel No. 2. First dab it on, let it work under the foil for 5 minutes and finally remove it. This lotion neutralizes the pH-value of the hair and fixes the new shape of the eyebrows.
Intermediate step: Tinting
If the eyebrows need to be tinted, this step follows after the Fixing Lotion. Start tinting from the lower edge of the eyebrow. A flat brush works well for applying the eyebrow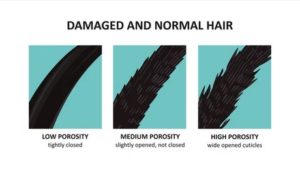 colour. Note to shorten the application time of the colour, because the outer layer of the hair, the hair cuticle, is not yet completely closed and therefore absorbs the colour faster. Remove the colour with a cotton pad. You will achieve good results with Swiss-o-Par eyebrow colour.
Step 6: Cleanse
To remove the remaining glue residue, use the enclosed Cleanser No. 3. Cleaning with water is not recommended, as this destroys the lifting effect. Simply apply the Cleanser with the microbrush, leave on for 1-2 minutes and then brush out the glue with the mascara brush or Y-applicator.
Step 7: Care
For eyebrow care, apply Conditioner No. 4 to seal in the hair. Avoid water, oily products and creams as well as heat for 24 hrs to allow the cuticle of the hair to re-seal completely, thus maintaining the desired shape.
If you would like to have stronger eyebrows, you should try a good eyebrow growth serum. It will give you longer, thicker and stronger brows. You can find very good reviews for XXL Lashes Serum and M2 Beauté Serum.
Conclusion:
An eyebrow lift ensures that the eyebrows stay in the desired shape for longer. As you can see, a brow lift really isn’t difficult and can be done in the comfort of your own home with the right accessories. Not only does it look fantastic, it also saves money and time, and it simplifies your daily makeup routine.
Leave a Reply